Microsoft Azure Nested Virtualization: Creating on-premise Windows Domain environments
Summary
Modern Microsoft Azure hypervisors support nested virtualization; meaning you can run virtual machines within virtual machines. With a bit of magic, you can create an effective “Virtual ESXi” server and run a few virtual machines from ISO files, which is much closer to an on-premise environment.
However, instead of ISOs, if I have a few existing Virtual Hard Disks (VHDs) that are configured to be domain-joined windows VMs, I can attach them as additional disks to a virtual machine running Hyper-V. I can then configure Hyper-V with a few VMs, using an attached disk as their image source. With this approach, I can avoid any runtime configuration.
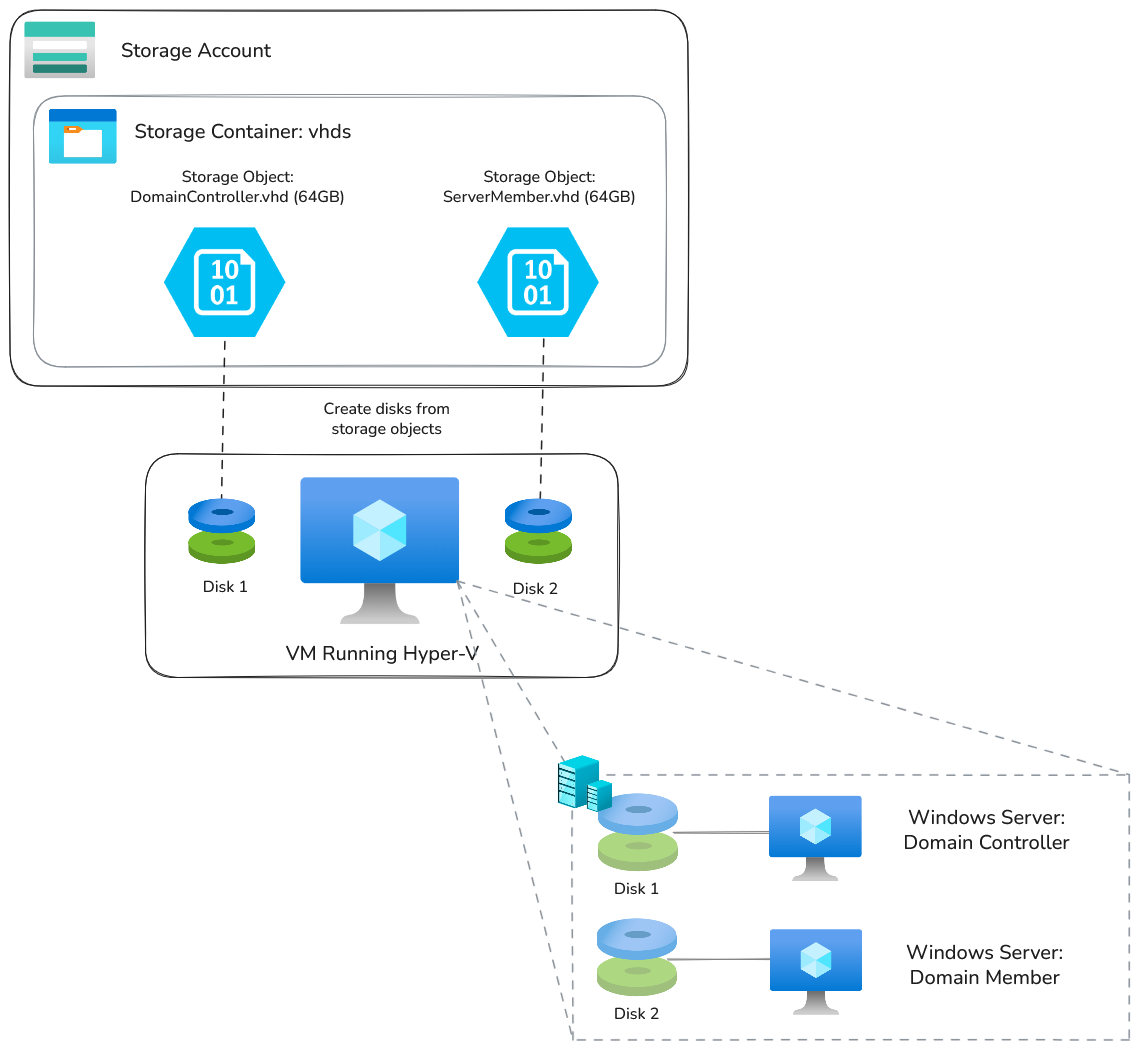
The end result is that I can have an effective “Virtual ESXi” server, running an on-premise Windows domain environment; all virtualized and deployed in a few minutes. Check out this video demonstration here.
Supporting IaC, including packer image definitions, can be found here <——.
Introduction
Nested virtualization isn’t a new capability for Microsoft (~2017), and as far as I’m aware, AWS dosen’t really support it, but Google Cloud does.
I’ve got a fair bit of experience building on-premise Windows domains (mainly Public Key Infrastructure), and trying to create immutable images of Windows domains is super frustrating. You’ve often got to wait for your Windows server Domain Controller (DC) to be up and running, and then try to coordinate numerous other machines to configure themselves and join the domain, which may require numerous restarts. If you want to configure the machines with ansible, you’ll need SSH installed on the machines, which isn’t (wasn’t) default. It just gets really messy, complex, and slow.
However, with this approach, once my domain is configured, I can effectively “snapshot” the entire domain and replay it using this nested-virtualization technique, rather than configuring anything at run time. This speeds up deployments and lends itself really nicely for lab environments.
FWIW, beginning with Windows 10 build 1809 and Windows Server 2019, OpenSSH is available as a feature on demand. For Windows Server 2025, it’s installed but not enabled.
Why not just run directly in Azure?
Of course, you can just deploy a Windows server machine directly into Azure as a virtual machine, BUT this technique allows you to simulate much closer to an on-premise environment.
I guess the main advantage is that you have an entirely sandboxed network (depending on your configuration). Your IP addressing scheme can be exactly as it is on-premise. You don’t need to worry about the Azure networking fabric getting in the way, such as the first few IP addresses being reserved in each subnet, or ARP issues, or NSG rules, or flow logs….
Also, although the Windows kernels are supposedly pretty much identical between on-premise and the cloud, the Virtual machines are subtly different. For example, many of the available OS images are running the Azure Windows VM Agent, meaning you can run VM extensions and get provisioning updates.
A note on networking with nested virtualization
With Azure nested-virtualization, you can configure reverse NAT on the host, which provides direct access to ports from VMs within Hyper-V.
For example, if you have a Windows Server running within Hyper-V, which is running IIS web server, you can expose that port externally. For my scenario I haven’t done that, as I want a completely isolated network within the Hyper-V VM. If you want to learn more about that, check out this blog.
Technical Details
Let’s assume that you have some Virtual Hard Disks (VHDs) and you want to deploy them in the above scenario.
In order to use nested virtualization in Microsoft Azure, you’ll first need to use a SKU that supports it.
Essentially, you need to find a SKU that supports hyper-threading, which isn’t particularly obvious. I haven’t found the capability exported by any APIs, and have had to go through the documentation looking for hyperthreading in the descriptions.
Fortunately, it seems that the newest generations of SKUs (E-series) support hyper-threading 👍 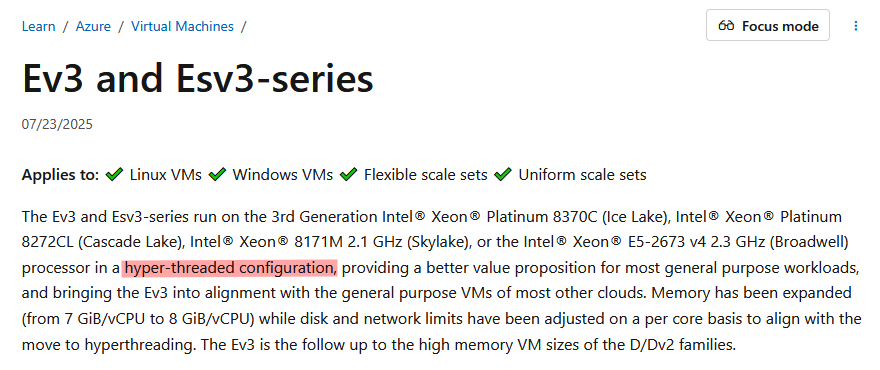
Once you’ve selected a virtual machine SKU that supports nested virtualization, nested virtualization will not automatically be running on VM launch.
It’s a pretty easy fix, just run the following from an administrative powershell prompt:
1
bcdedit /set hypervisorlaunchtype auto
and then restart the PC.
There are some more sophisticated official startup scripts, but they haven’t been updated in 10 years 👀
You’ll then need to install the Hyper-V feature, which you can do via the GUI, or via powershell with:
1
Install-WindowsFeature -Name DHCP,Hyper-V -IncludeManagementTools
On the VM, it’s also worth setting Hyper-V enhanced session mode, which allows you copy-paste into VMs, and resize VM windows.
1
Set-VMHost -EnableEnhancedSessionMode $True
You now have a machine capable of nested virtualization. I’ve put all this code, including a sysprep step, into a packer image which you can find here.
A note on 6th generation images
6th generation Microsoft Azure images are backed by NVMe, as opposed to SCSI, which makes them very fast. Unfortunately, I found a bug with Packer, which wouldn’t let me deploy an image built for 6th generation images (I’m not the only one who’s had issues.
A note on VM disks
If creating a new virtual machine in Hyper-V, it will create a.vhdxdisk storage format. This is essentially a dynamic disk size, as opposed to.vhd, which is a static size. Obviously.vhdxis better, as it may use less space. However, in order to create Microsoft Azure data disks from Storage Account Objects, the virtual disk object must be in.vhdformat, and not.vhdx. Fortunately, you can easily convert the disk in Powershell, it just takes a while and uses up a lot of space:Convert-VHD -Path "C:\ProgramData\Microsoft\Windows\Virtual Hard Disks\WindowsServerMember.vhdx" -DestinationPath "D:\WindowsServerMember.vhd" -VHDType Fixed
Once a VHD disk has been attached to the VM, in order to use it in Hyper-V, the disk needs to be in an “offline” state from the OS’s perspective. You can easily do this in powershell via the following:
1
Set-Disk -Number 2 -IsOffline $true
The first disk (starting at 0) is normally the OS, and then the second disk a temporary RAM disk. 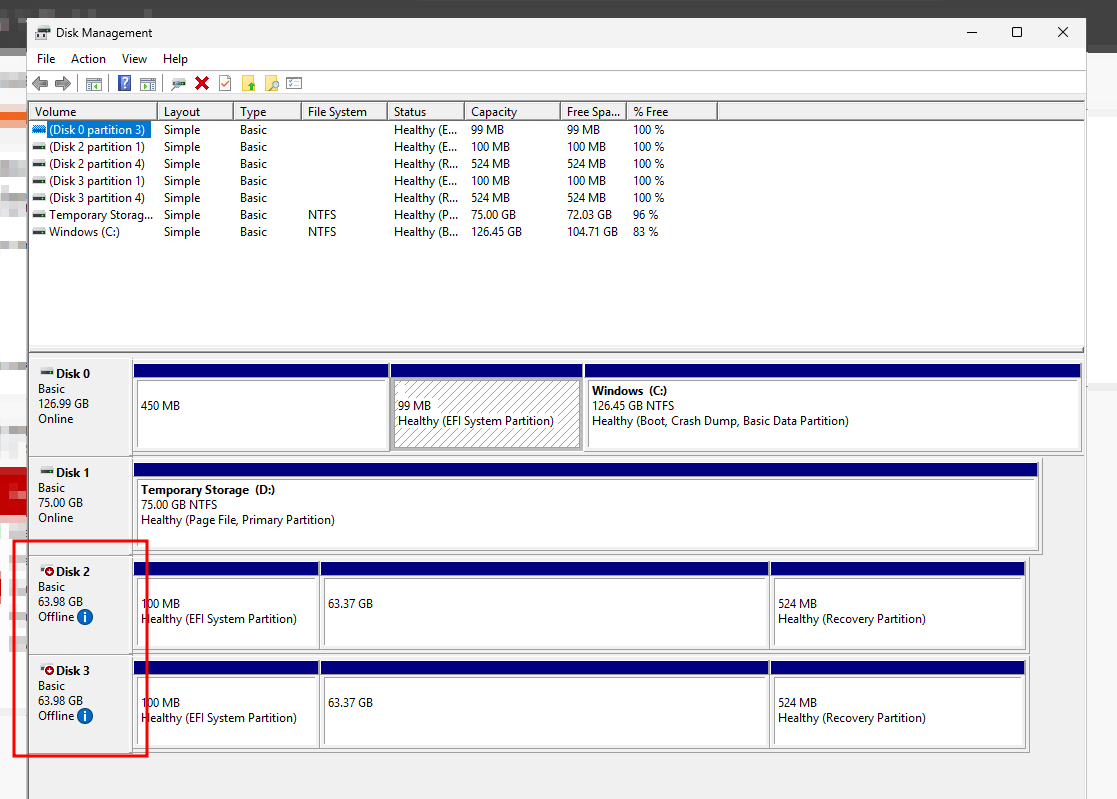
Once the disks are offline, in Hyper-V you can create your VM configuration, selecting a source disk as the VM source. 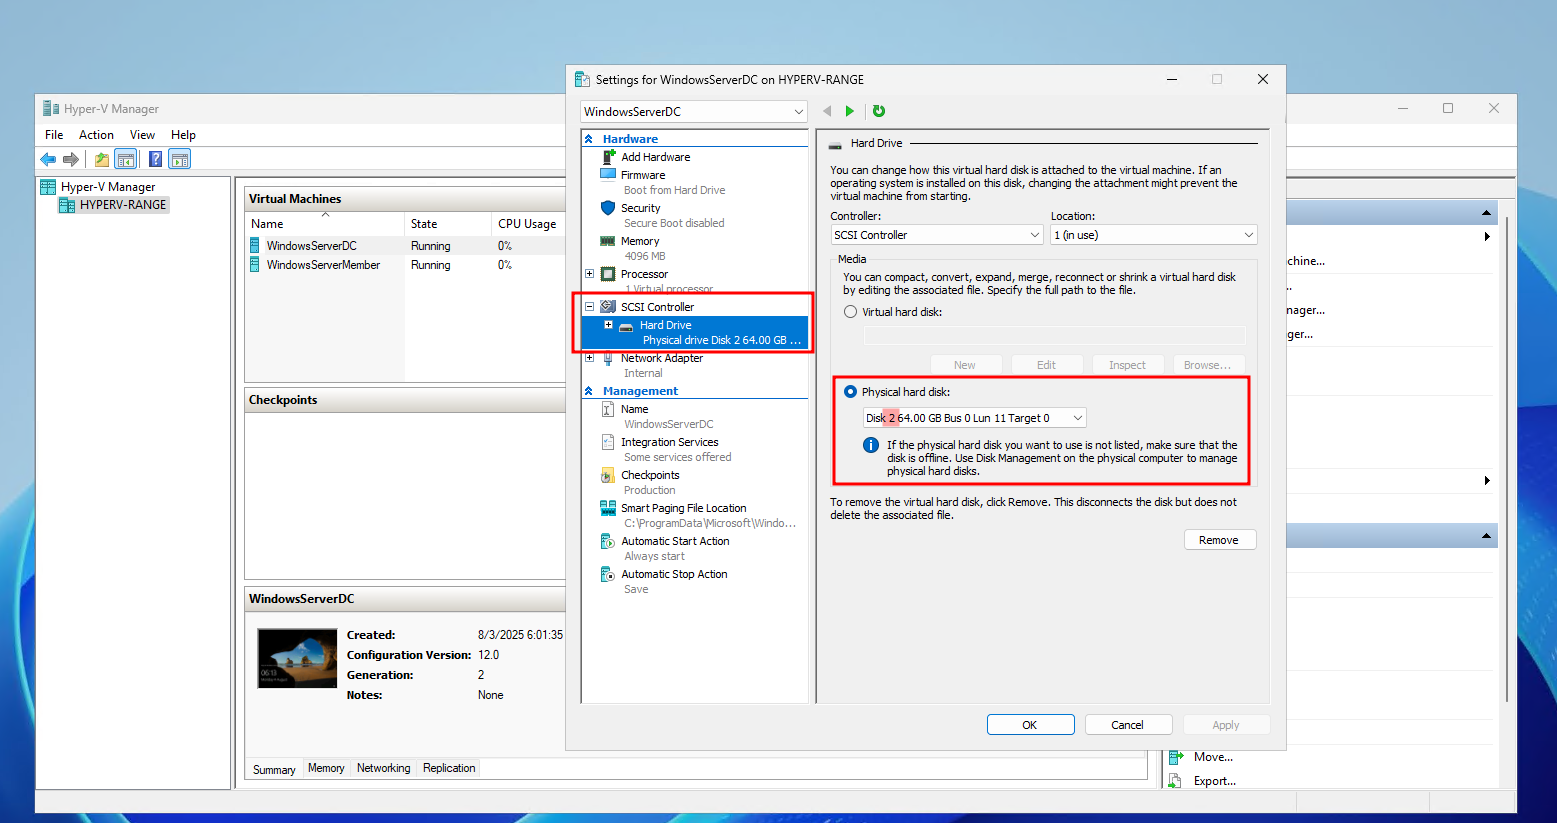
In order to boot the VM, you’ll likely need to disable Secure Boot: 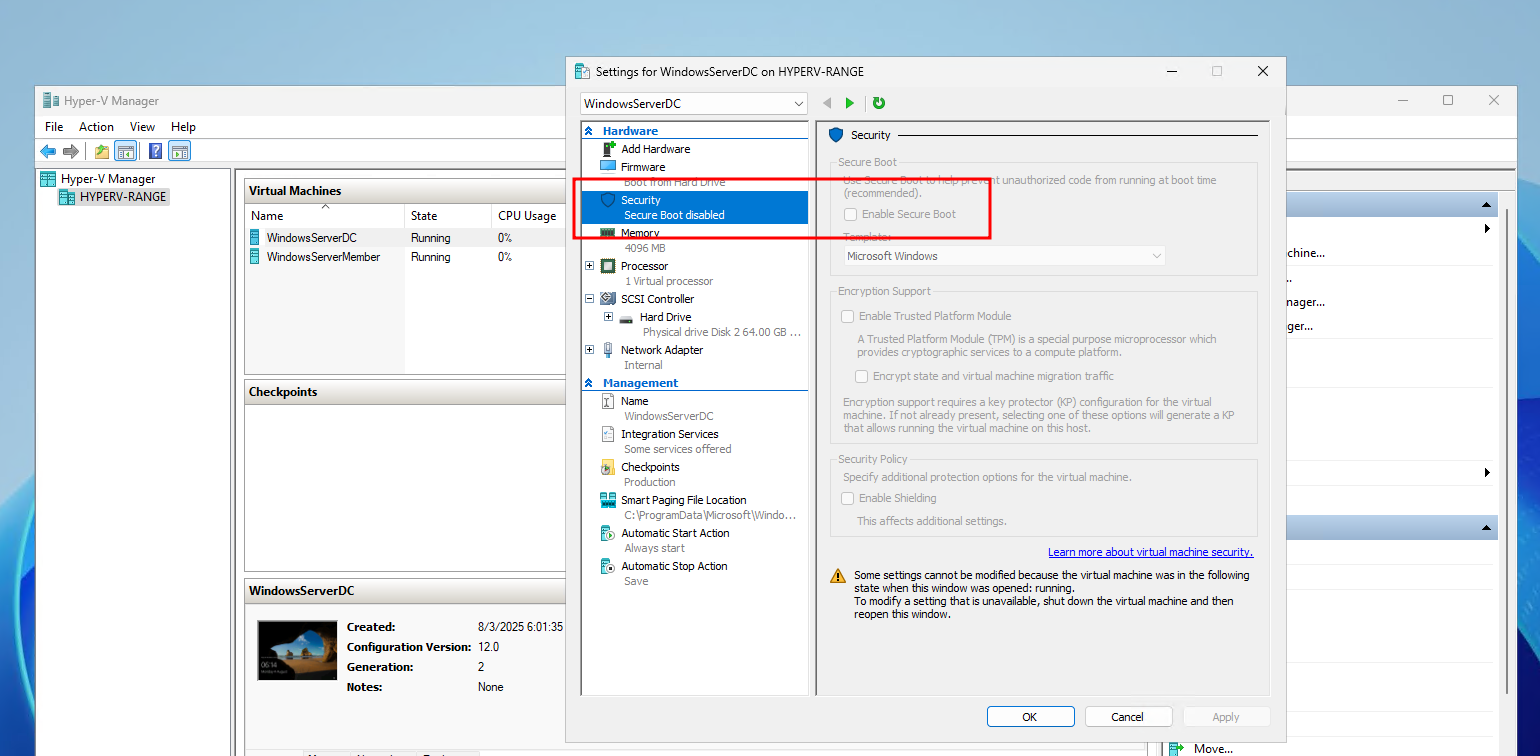
Otherwise, you may find the following error: 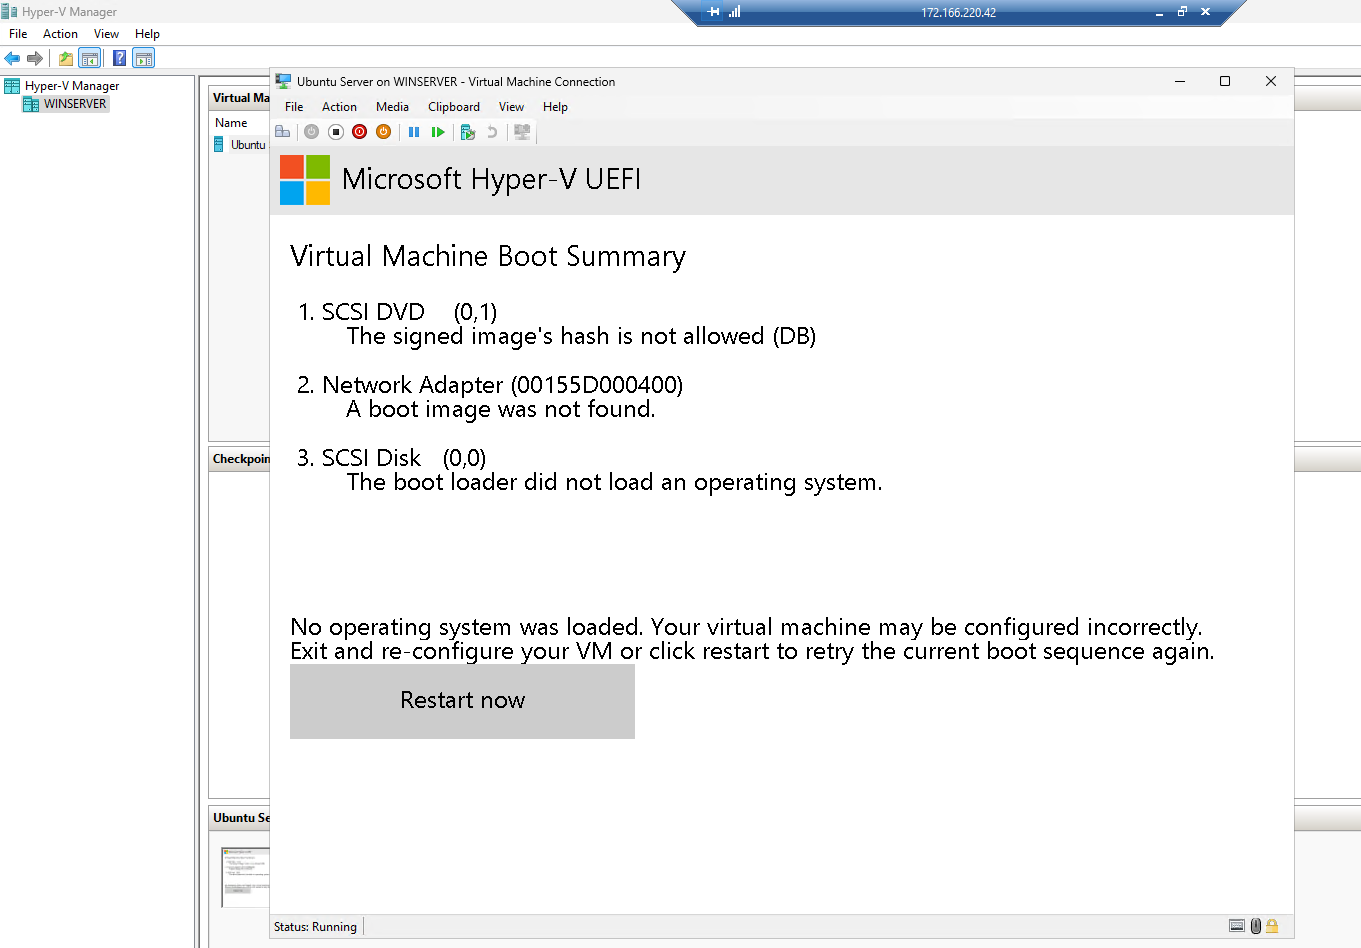
6th generation NVMe images likely have some considerable performance benefits, but because of the Packer bug, I was unable to use it in this proof of concept. However, looking at the Hyper-V configuration and the secure boot error, I’m not sure if I could use NVMe, as Hyper-V is expecting an SCSI-controller. The “older” generations of VMs are all using SCSI instead of NVMe.
Of course, all this can be automated in Powershell:
1
2
3
4
5
6
Set-Disk -Number 2 -IsOffline $true
New-VM -Name "WindowsServerDC" -MemoryStartupBytes 4GB -Generation 2 -NoVHD -SwitchName "Internal"
Add-VMHardDiskDrive -VMName "WindowsServerDC" -DiskNumber 2 -ControllerType SCSI -ControllerNumber 0 -ControllerLocation 1
Set-VMFirmware -VMName "WindowsServerDC" -EnableSecureBoot Off -FirstBootDevice $(Get-VMHardDiskDrive -VMName "WindowsServerDC")
Set-VM -Name "WindowsServerDC" -AutomaticStartAction Start -AutomaticStartDelay 30
Start-VM -Name "WindowsServerDC"
VM Networking
There is only one piece of smoke and mirrors with this proof of concept, which is the networking.
As we are just starting a .vhd file, all the VM’s configuration is already set. If the VM is already joined to a domain, then when starting the VM, it’ll still be joined. However, just because it’s already joined the domain, dosent mean that the domain is reachable on this fresh deployment.
With Hyper-V, the network interfaces within the VM are effectively ephemeral, and are controlled by Hyper-V. This means that when a VM is booted from disk, it dosent have any IP address configuration. That means that any domain is then unreachable, unless there is some startup scripts configured within the OS to reset the IP address on boot. Windows on-premise domains usually use statically assigned IP addresses, which means we will need to reconfigure these IP addresses on first boot.
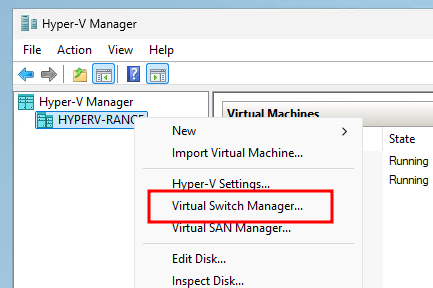
Additionally, depending on your requirements, you’ll likely need to create a Hyper-V networking switch, and associate your VMs with that “network”.
1
New-VMSwitch -Name "Internal" -SwitchType Internal
For my PoC, I’ve saved the following script (or variants of it) on the Windows VMs:
1
2
3
4
5
6
7
8
9
10
11
12
13
14
15
16
17
18
19
20
21
22
23
24
25
26
27
28
29
30
31
32
33
34
35
36
37
38
39
40
41
42
43
44
45
46
47
48
49
50
51
52
53
54
55
56
Start-Transcript -Path "C:\Logs\Set-StaticIP-$(Get-Date -Format 'yyyyMMdd-HHmmss').log"

try {
$IPAddress = "192.168.1.14"
$SubnetMask = "255.255.255.0"
$DNS1 = "192.168.1.1"

# Get the first active Ethernet interface that's not virtual or disconnected
$adapter = Get-NetAdapter | Where-Object {
    $_.Status -eq 'Up' -and
    $_.InterfaceType -notlike '*Loopback*' -and
    $_.Virtual -eq $false
} | Select-Object -First 1

if ($null -eq $adapter) {
    Write-Host "No active network adapters found. Please check your network connections."
    exit 1
}

Write-Host "Configuring network adapter '$($adapter.Name)' with static IP $IPAddress"

# Remove any existing IP addresses (DHCP or static)
Remove-NetIPAddress -InterfaceIndex $adapter.InterfaceIndex -Confirm:$false -ErrorAction SilentlyContinue

# Remove any existing routes
Remove-NetRoute -InterfaceIndex $adapter.InterfaceIndex -Confirm:$false -ErrorAction SilentlyContinue

# Set static IP address
New-NetIPAddress -InterfaceIndex $adapter.InterfaceIndex `
                 -IPAddress $IPAddress `
                 -PrefixLength 24 `
                 | Out-Null

# Set DNS servers
Set-DnsClientServerAddress -InterfaceIndex $adapter.InterfaceIndex `
                           -ServerAddresses $DNS1

# Restart the adapter to ensure changes take effect
Restart-NetAdapter -Name $adapter.Name -Confirm:$false

# Verify the configuration
$newConfig = Get-NetIPConfiguration -InterfaceIndex $adapter.InterfaceIndex

Write-Host "`nConfiguration successful!"
Write-Host "Interface: $($adapter.Name)"
Write-Host "IP Address: $($newConfig.IPv4Address.IPAddress)"
Write-Host "Subnet Mask: $SubnetMask"
Write-Host "DNS Server: $($newConfig.DNSServer.ServerAddresses)"

}
catch {
    Write-Host "ERROR: $_" -ForegroundColor Red
}
finally {
    Stop-Transcript
}
I’m then just using Windows Task scheduler to run the script on boot.
For the Domain Controller, it’s important to set the DNS to 127.0.0.1, and run the tasks as the system account and not a local user.
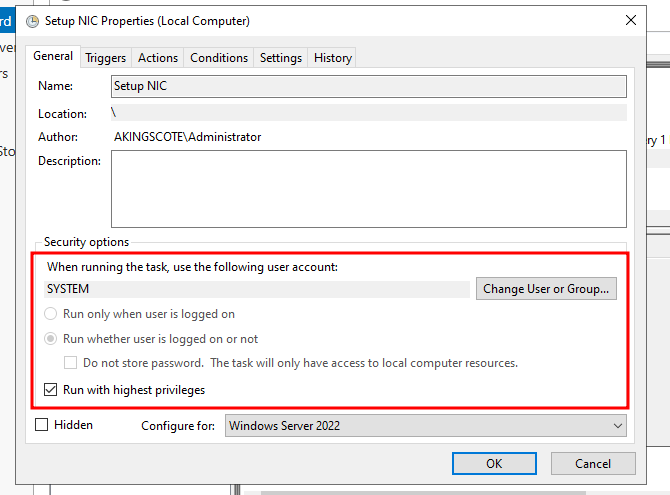
I’m just running the script directly with Powershell on boot: C:\Windows\System32\WindowsPowerShell\v1.0\powershell.exe -file c:\temp\SetupNic.ps1" 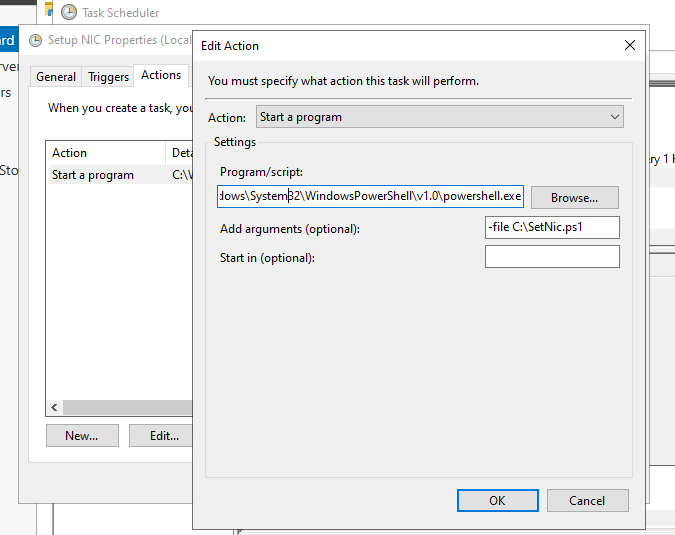
Result
The proof of concept successfully demonstrates:
- On-demand domain environments: Deploy a fully functional Windows domain (DC + member servers) E2E in under 10 minutes by attaching VHDs to a Hyper-V host VM in Azure.
- Network fidelity: Isolated, on-premise-like IP addressing (e.g.,
192.168.1.0/24) without Azure subnet reservations or NSG interference. - Automation-friendly: Domain connectivity validated via
nltest /sc_reset:akingscote.com, with static IPs configured via startup scripts.
You can tie all this together and automate the lot of it, as demonstrated in this video.
The complete packer definition for the Hyper-V image can be found here. Complete terraform example can be found here.
Nested Virtualization is used by Microsoft themselves in the HCI stack. I recommend checking out this video, which served as inspiration for this idea.
Creating Virtual Hard Disks (VHDs)
If you don’t have a bunch of VHDs ready, you might want to deploy the above packer image (Hyper-V host) and use that to create the VHDs.
So essentially create this image with packer, then run this terraform, which will create what I call a “base” VM. It’s just the Hyper-V enabled VM, with a decent size hard disk which will be enough to build out a few VMs.
You’ll need to create a VM switch within Hyper-V, so that the VMs can talk to each other. You’ll also likely need to give each IP a static IP address and then install the various Windows server roles.

Once your VMs are ready, you’ll need to shut them down, and as explained earlier, you’ll unfortunately need to convert the disks from vhdx files to fixed-size vhd files. This takes a little time and requires a fair amount of disk space. You can do this with the following powershell script:
1
Convert-VHD -Path "C:\ProgramData\Microsoft\Windows\Virtual Hard Disks\WindowsServerMember.vhdx" -DestinationPath "D:\WindowsServerMember.vhd" -VHDType Fixed
Once that operation is completed, you’ll need to upload to your storage account. As you are copying such large files (~64GB), it’s best to use Az-Copy.
1
2
3
4
5
6
7
8
9
10
11
12
13
14
15
16
17
18
19
20
21
22
23
$vhdPath = "C:\ProgramData\Microsoft\Windows\Virtual Hard Disks\UbuntuServer\UbuntuServer.vhdx"
$destinationUrl = "https://vhdstoragea3905e7a.blob.core.windows.net/vhds?sv=2020-02-10&ss=b&srt=co&sp=rwac&se=2025-07-28T09:50:34Z&st=2025-07-27T09:50:34Z&spr=https&sig=DbBKo%2BAC2OjCS6AmlBvbOozKn9JXbJrJW8Me1B7ISOs%3D"

# Check if AzCopy is available
if (-not (Get-Command azcopy -ErrorAction SilentlyContinue)) {
    Write-Output "Downloading AzCopy..."
    $azcopyUrl = "https://aka.ms/downloadazcopy-v10-windows"
    $downloadPath = "$env:TEMP\azcopy.zip"
    Invoke-WebRequest -Uri $azcopyUrl -OutFile $downloadPath
    Expand-Archive -Path $downloadPath -DestinationPath "$env:TEMP\azcopy" -Force
    $azcopyExe = (Get-ChildItem "$env:TEMP\azcopy" -Recurse -Filter "azcopy.exe").FullName
    Copy-Item $azcopyExe -Destination "$env:windir\system32\azcopy.exe" -Force
}

# Upload using AzCopy
Write-Output "Starting upload with AzCopy..."
azcopy copy $vhdPath $destinationUrl --blob-type PageBlob --log-level INFO

if ($LASTEXITCODE -eq 0) {
    Write-Output "VHD uploaded successfully"
} else {
    Write-Error "VHD upload failed with error code $LASTEXITCODE"
}
In the above example, I’ve added in a SAS token for the vhds container within the vhdstoragea3905e7a storage account. The storage account has long since been deleted.
Once that copy operation has completed, you are now in the starting position for the beginning of this blog.
Summary
For security labs, training, or pre-production testing, this method reduces setup time to minutes while preserving on-premise behaviors. As Microsoft expands nested virtualization support (e.g., for Azure HCI), expect tighter integration and fewer workarounds.
I’d like to try this proof of concept again when the 6th generation Packer image bug is fixed, allowing me to use NVMe images (assuming it’s possible with Hyper-V). I’d also like to up the specification for the host VM, as well as the individual VMs within the host. I’d also like to explore more mature mechanisms for configuring the VM networking, without having to rely on OS-level scripts.
I’d also love it if Microsoft allowed data disks to be created from vhdx, rather than forcing me to convert to fixed vhd files. In a couple of years, hopefully the space is more mature.