MicroK8s Basic Deployment
I’m trying to learn Kubernetes so I am playing around with MicroK8s to run a deployment locally on my Ubuntu Virtual Machine.
This post describes a basic deployment of HTTPBin in a cluster of three pods, with external access to the pods. Im very new to kubernetes, so this is a basic post where ive been feeling my way to try and gain a better understanding. I hope that my simple explanation (as im not yet capable of explaining it in detail) help others as i was overwhelmed with information on the subject.
My current understanding is that each pod runs a container (docker). Pods are mortal and may fall over. As they are running containers, it dosent matter. The benefit of running things in containers is that each instance is self contained, so any dependencies and configurations are the same across multiple instances. A pod has its own private IP address within a cluster (a group of pods). A pod is monitored and if it falls over, it can be restarted. Pods within a cluster can talk to each other. Service discovery can be handled by kubernetes or other add-ons such as istio, which may add security measures like side car proxies.
A Deployment is a number of Pods that run the same services. So in my example, i’ll create a deployment of the HTTPBin which will fire up 3 pods each running the HTTPBin docker container. Access to the deployment (the logical grouping of the pods) will be via a LoadBalancer. The LoadBalancer is a service which provides a public IP address. It seems that there are numerous says of providing outside access to a deployment/pod/cluster - see https://kubernetes.io/docs/concepts/services-networking/service/#publishing-services-service-types
It seems that a NodePort isnt necessarily ideal for production, so i figure i should use a local load balancer as the steps to moving from development (MicroK8s) to production (AKS or similar) should be minimal (i hope).
Luckily, MicroK8s has a load balancer add-on called “metallb” which replicates an external load balancer. First thing to do is to get your local interface IP address. Im still using the older Ubuntu 16.04, so im using ifconfig.
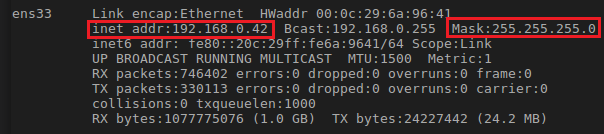
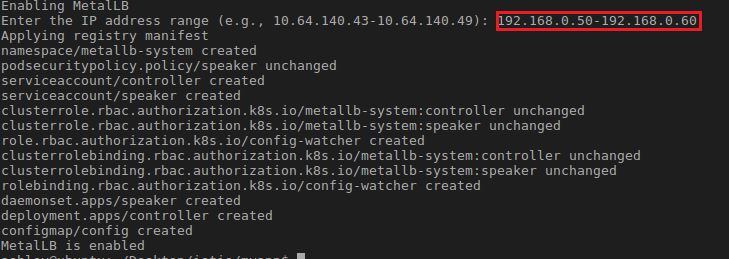
My IP address is 192.168.0.42 with a /24 subnet mask. When installing metallb you’ll need to provide a range of IP addresses that it can use to provide outside access into whatever kubernetes things you configure it for. In my example. i’ll provide the ip range 192.168.0.50-192.168.0.60.
Install MicroK8s
1
2
sudo apt-get install snap
snap install microk8s --classic
Enable the metallb addon
1
sudo microk8s enable metallb
When prompted, add in the appropriate IP range. These IPs must not be in use and must be on the same network as your interface.
[
To use the kubectl command in MicroK8s, the full command is `sudo microk8s.kubectl” which is a bit of a mouthful, so i like to set an alias
1
alias kubectl="sudo microk8s.kubectl"
Aliases are only set for that terminal session, so if you close the terminal or restart the machine you’ll lose the alias.
So if you have multiple different endpoints (like on a website) you may want to add an Ingress to explicity define routes to the services. However, this example is so basic that all you need is two configuration items: the deployment of pods and the LoadBalancer service. You can put them all in a yaml file (e.g test-app.yaml) that looks like this:
1
2
3
4
5
6
7
8
9
10
11
12
13
14
15
16
17
18
19
20
21
22
23
24
25
26
27
28
29
30
31
32
33
apiVersion: apps/v1
kind: Deployment
metadata:
  name: test-app-deployment
  labels:
    app: test-app
spec:
  replicas: 3
  selector:
    matchLabels:
      app: test-app
  template:
    metadata:
      labels:
        app: test-app
    spec:
      containers:
      - name: test-app
        image: kennethreitz/httpbin
        ports:
        - containerPort: 80
---
apiVersion: v1
kind: Service
metadata:
  name: my-service-new
spec:
  selector:
    app: test-app
  ports:
    - protocol: TCP
      port: 80
  type: LoadBalancer
So firstly we are defining a Deployment. A deployment is a grouping of pods serving the same thing (httpbin container). You can see under the spec that its referencing the public httpbin docker container image. This “deployment” is called “test-app-deployment”, each pod within the deployment will be running a container called “test-app”. The second half of the file describes the service. The “selector” section of the service describes what the service will point to. in this case its the deployment as a whole rather than an individual pod. The type is of LoadBalancer and not NodePort as i want this to be as close to production as possible. The LoadBalancer service will use metallb and will set the external IP address of the service to one within my defined range.
Apply the file with the following:
kubectl apply -f test-app.yaml
Test that the service now has an external IP address
kubectl get svc

Test that the service can connect to the deployment and that each instance of the httpbin is presenting a valid endpoint
kubectl get endpoints

Online, many people create their services using the command line which i find a goofy concept. Ive seen people create NodePort services with the following:
sudo microk8s.kubectl expose deployment test-app-deployment --type=NodePort --port=80 --name=ak-service
I really dont like this approach as i feel the infrastructure should be described in code to be repeatable.
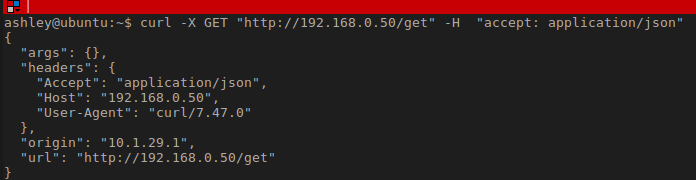
From you main machine, try a HTTP GET to the service external-ip, which will fall onto one of the pods in the deployment. I believe by default the LoadBalancer implements a round robin approach.
curl -X GET "http://192.168.0.50/get" -H "accept: application/json"
[
Alternatively, if you really dont want to use a LoadBalancer service, you can expose the service via an Ingress. With an ingress, each rule much map to a service. On the Ingress Controller itself (not defined in any of your .yaml files) you set the default backend - where any requests that dont match your rules will do. I think that there is limited functionality with the MicroK8s ingress - its meant for local development. So the IP address that your ingress will get will be 127.0.0.1 (as opposed to 192.168.0.50 with the load balancer)
Make sure ingress is enabled sudo microk8s.enable ingress
1
2
3
4
5
6
7
8
9
10
11
12
13
14
15
16
17
18
19
20
21
22
23
24
25
26
27
28
29
30
31
32
33
34
35
36
37
38
39
40
41
42
43
44
45
46
47
48
49
apiVersion: apps/v1
kind: Deployment
metadata:
  name: test-app-deployment
  labels:
    app: test-app
spec:
  replicas: 3
  selector:
    matchLabels:
      app: test-app
  template:
    metadata:
      labels:
        app: test-app
    spec:
      containers:
      - name: test-app
        image: kennethreitz/httpbin
        ports:
        - containerPort: 80
---
apiVersion: v1
kind: Service
metadata:
  name: my-service-new
spec:
  selector:
    app: test-app
  ports:
    - protocol: TCP
      port: 80
---
apiVersion: networking.k8s.io/v1beta1
kind: Ingress
metadata:
  name: test-ingress
  annotations:
    nginx.ingress.kubernetes.io/rewrite-target: /
spec:
  rules:
  - http:
      paths:
      #each path must have a corresponding service
      - path: /
        pathType: Prefix
        backend:
          serviceName: my-service-new
          servicePort: 80
The above snippet shows that we have the same deployment, the service references the deployment and the ingress calls the service. Notice how the “type=loadbalancer” is removed from the service.
sudo microk8s.enable ingress kubectl apply -f test-app.yaml
Give it a short while for your ingress to get an IP (localhost) and then you should be able to try a curl from your VM to http://127.0.0.1/get