Self Sign SSL Certificate
This guide is a simple demonstration on how you can self sign a certificate for use in SSL and install on an Apache Web Server. Open-SSL will be used in a Windows OS Desktop and the certificate will be imported into the web server.
Firstly, ensure you have an Ubuntu Apache Web Server up and running. You can download the Ubuntu Server ISO from here. Im just running mine in a virtual machine. Ensure you know the root password when creating the server.
The following are prerequisites for the the server in order to implement the steps detailed for SSL implementation:
Static IP
Log into the server as root, or log in as a user and issue a sudo su to change to the root account. Issue to following command to enter the network interface settings.
nano /etc/network/interfaces
This opens up the interfaces file using the nano text editor. You could replace nano with vi to use the vi editor or gedit to use the gedit editor.
# comments out a line. If the keyboard is in the default (American) layout, the # can be accessed by pressing SHIFT + 3.
auto ens33 iface ens33 inet static address netmask gateway dns-nameservers Press CTRL + X then press Y to save and exit the editor.
Issue the following to restart the networking service and bring the interface online.
sudo service networking restart OR sudo /etc/init.d/networking restart
Bring interface down/up
sudo ifconfig ens33 up OR sudo ifup ens33
sudo ifconfig ens33 down OR sudo ifdown ens33
**Note – ens33 is the name of my interface on this server, typically the interface is **_eth0_** **
Ensure you have internet access by pinging www.google.com ping www.google.com Hostname
You can use a SSL certificate on a hostname or a specific IP address. Its preferred to use against a hostname as the IP may change. If you configure it to use a specific hostname, then you can always change the DNS record IP address and avoid having to get another certificate if the IP address of the server needs to change. Additionally, you’ll struggle to find a Certificate Authority that will accept requests for IP Addresses.
In versions of Ubuntu server 14.04 or newer, the hostname is configured in two files which will need updating sudo nano /etc/hostname

Press CTRL + X then press Y to save and exit the editor.
sudo nano /etc/hosts
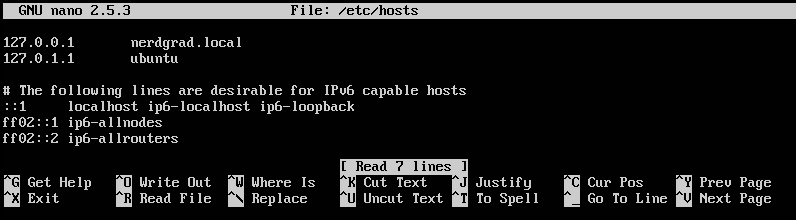
Press CTRL + X then press Y to save and exit the editor. Then restart the server by issuing sudo shutdown -r now
Apache
Now we are ready to update the system and install Apache. Issue the following commands to download the relevant packages. sudo apt-get upgrade sudo apt-get update sudo apt-get install apache2
Then restart the service sudo /etc/init.d/apache2 restart OR sudo service apache2 restart
In a web browser, navigate to your hostname OR IP address to see the default apache loading page and verify that the installation has worked.
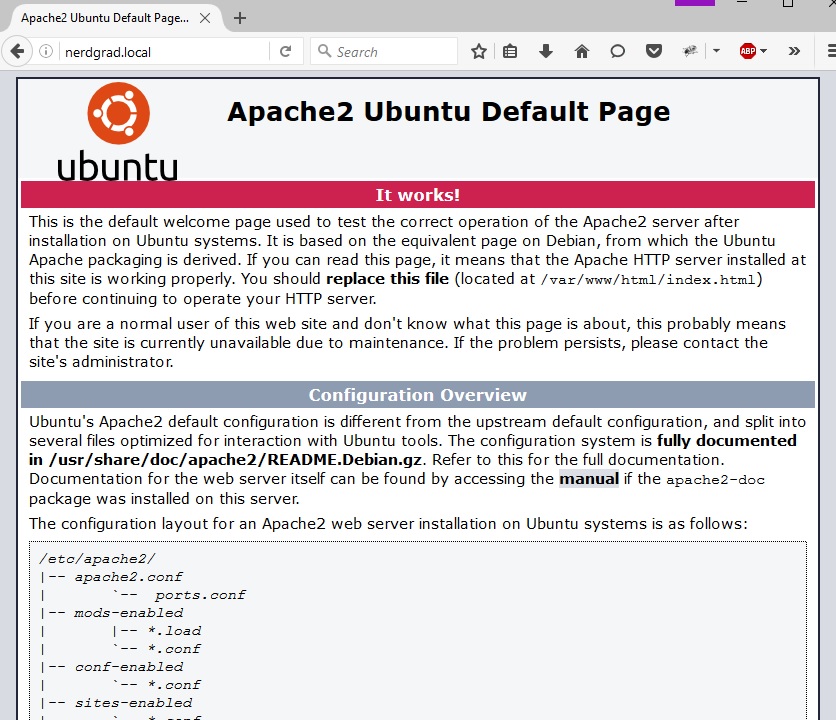
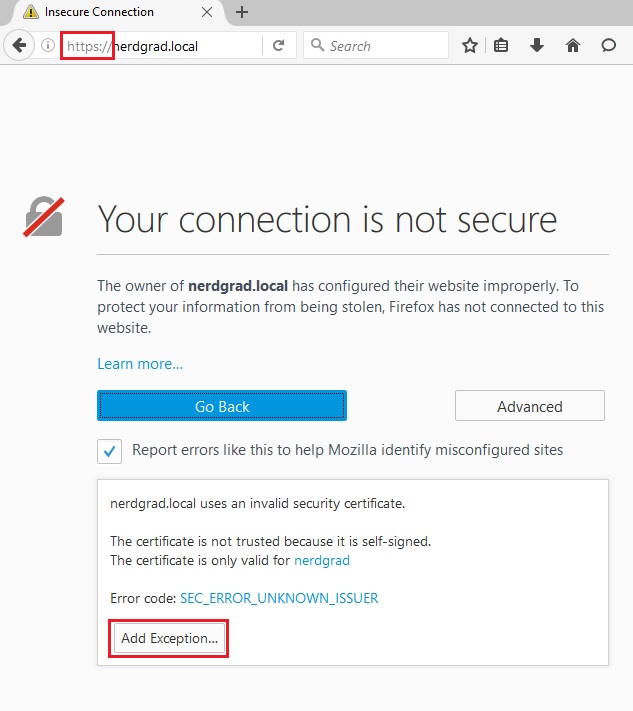
The more astute may have notice that I had my DNS set to Googles server but yet nerdgrad.local resolved perfectly fine. This was achieved by by editing my host file on my local windows machine which takes precedence over any DNS server. This can be edited on Windows by navigating to C:\Windows\System32\drivers\etc\ and adding an entry in the hosts file. The name nerdgrad.local was added pointing to my Apache server IP address of 10.44.2.251.
Troubleshooting
sudo tail /var/log/apache2/error.log sudo tail /var/log/syslog
FTP
As we are going to use Open-SSL on windows, it’ll be a good idea to install FTP on the Ubuntu Server so that we can easily zip across any files we need. FTP is a pretty fundamental feature of most web servers although SFTP should be used where possible – SFTP installation and configuration is out of scope for this post.
On the Ubuntu server, issue the following to download the FTP package: sudo apt-get install vsftpd After that has been installed, open up the configuration file in your favourite text editor: sudo nano /etc/vsftpd.conf Scroll down the page and remove the comments (the ‘#’) from the following lines write_enable=YES local_umask=022
Add the following at the bottom to enable PASSIVE mode pasv_enable=YES pasv_min_port=40000 pasv_max_port=40100 (FTP has two modes. Active mode is for commands, Passive mode is for transferring files, we need this enabled)
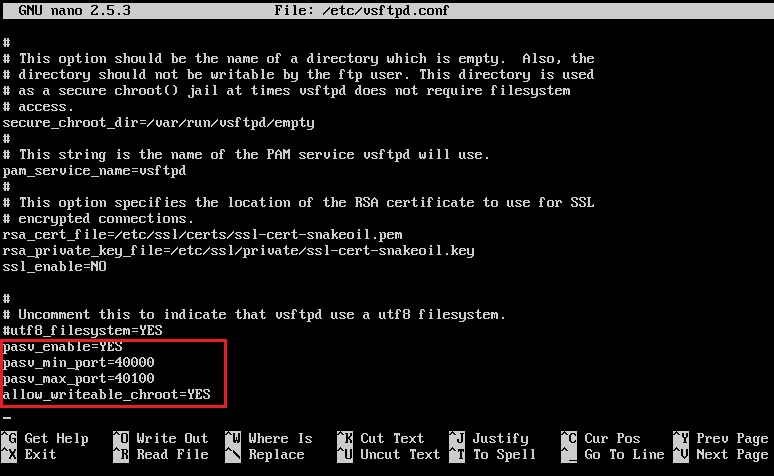
Add this to the bottom also to allow root to login and edit.
allow\_writeable\_chroot=YES
Obviously this is not recommended in an actual implementation, but this is just a demonstration.
Restart the FTP Service sudo service vsftpd restart OR sudo /etc/init.d/vsftpd restart
On your local machine, use an FTP client like FileZilla to connect to the server and verify that you have access to the /var/www/html/ directory. 
Open-SSL
Ok, finally we are ready to start talking SSL. Download the Open-SSL toolkit binary version (not officially recommended by OpenSSL but I think its great!) as it is easy to use in Windows OS:
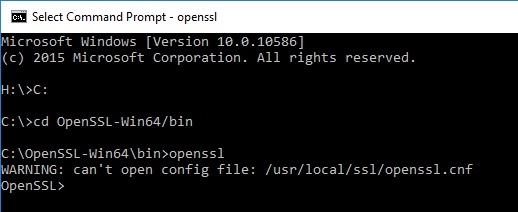
There are plenty of other ways of running OpenSSL like using a CYGWIN shell, but lets keep it simple. I will be using the 64 Bit version. Install the program somewhere memorable. I have used C:\OpenSSL-Win64 which is the default installation location. In a command prompt, navigate to the installation folder and go into the bin directory. Type openssl and press enter. You may get a warning message about the configuration file. You can ignore that for now, we will manually tell the program where our configuration file is when we need to.
To print the OpenSSL version issue openssl version -a
The process for implementing SSL on a WebServer is like this: 1. Generate a strong private key 2. Create a Certificate Signing Request (CSR) and send to a Certificate Authority (CA) for them to verify we are who we say we are. (We basically going to send it to ourselves, hence Self-Signed) 3.Install the CA Provided Certificate on the Server
A little bit about SSL… There are three main types of Keys RSA – mainly used in WebServers DSA – limited to 1024 bits ECDSA – not widely supported by CA’s. I think bitcoin uses this method though.
You should always explicitly state how long you want the key to be. The longer the key, the more secure it is. Some companies have policies that dictate what the minimum key size should be. At the time of writing, a 2048 RSA key is considered secure but this could change.
A Passphrase is a recommended optional component improve security of a key. They create a relationship with the key in generation which makes the key dependent on the passphrase. If you forget/loose the passphrase you’ll be in trouble. By design, private keys are kept in encrypted memory so you should make sure that they are tucked away somewhere hidden to help improve security.
There are also three common encryption methods: Data Encryption Standard (DES) – can be cracked Triple Encryption Standard (3DES) – three times as secure as DES Advanced Encryption Standard (AES) – strongest available method (currently)
Key Generation
To generate an RSA key use the following command: genrsa -aes128 -out fd.key 2048 fd is just the key name, you can call it anything. You could also use -aes192 or -aes256
To view format of the private key rsa –text –in fd.key
To extract the public part of a RSA private key rsa -in fd.key –pubout –out fd-public.key
| If you wanted to Generate DSA Key instead… dsaparam –genkey 2048 | openssl dsa –out dsa.key aes128 This pipes two commands into one,first step is creating the DSA parameters and the second step is to create the key. By piping them into one long command, a password-generated key is created without leaving any temporary files (DSA Parameters) on disk. |
Create Certificate Signing Request (CSR)
Using the RSA key (fd.key) will will create a CSR which would usually be sent to a CA. However we are going to create the CSR and sign it ourselves. The command to generate the CSR is: req -new -key fd.key -out fd.csr -config C:\OpenSSL-Win64\bin\openssl.cfg where fd.key is the key and the fd.csr is the CSR output. 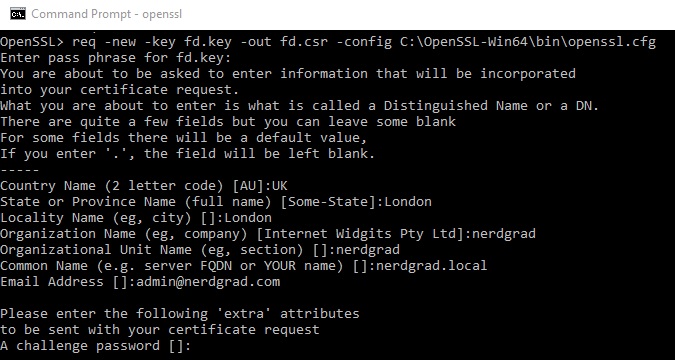
Fill in the information as best you can. Ensure your FQDN is correct. For example, premierleague.com not a sub-domain like fantasy.premierleague.com
Renewing a Certificate
There may be a time where you need to renew an expired certificate. If you dont need to make any changes to the certificate this is pretty simple. Just use the following command: x509 -x509toreq -in fd.crt -out fd.csr -signkey fd.key
Remove Passphrase from Key – Optional (not recommended)
When using passphrases in SSL in apache, the password will be required every time the server is restarted. To remove the passphrase from a key, use the following:
In a normal CMD prompt (not OpenSSL) – copy the key to a backup cp fd.key fd.key.org
Back in OpenSSL (accessed by issuing ‘openssl’ from the openSSL directory) rsa -in fd.key.org -out fd.key
Signing Your Own Certificate With a CSR
x509 -req -days 365 -in fd.csr -signkey fd.key -out fd.crt
This will create a certificate as “proof” you are who you say you are.
Without a CSR (using only the key – not needed here) req -new -x509 -days 365 -key fd.key -out fd.crt
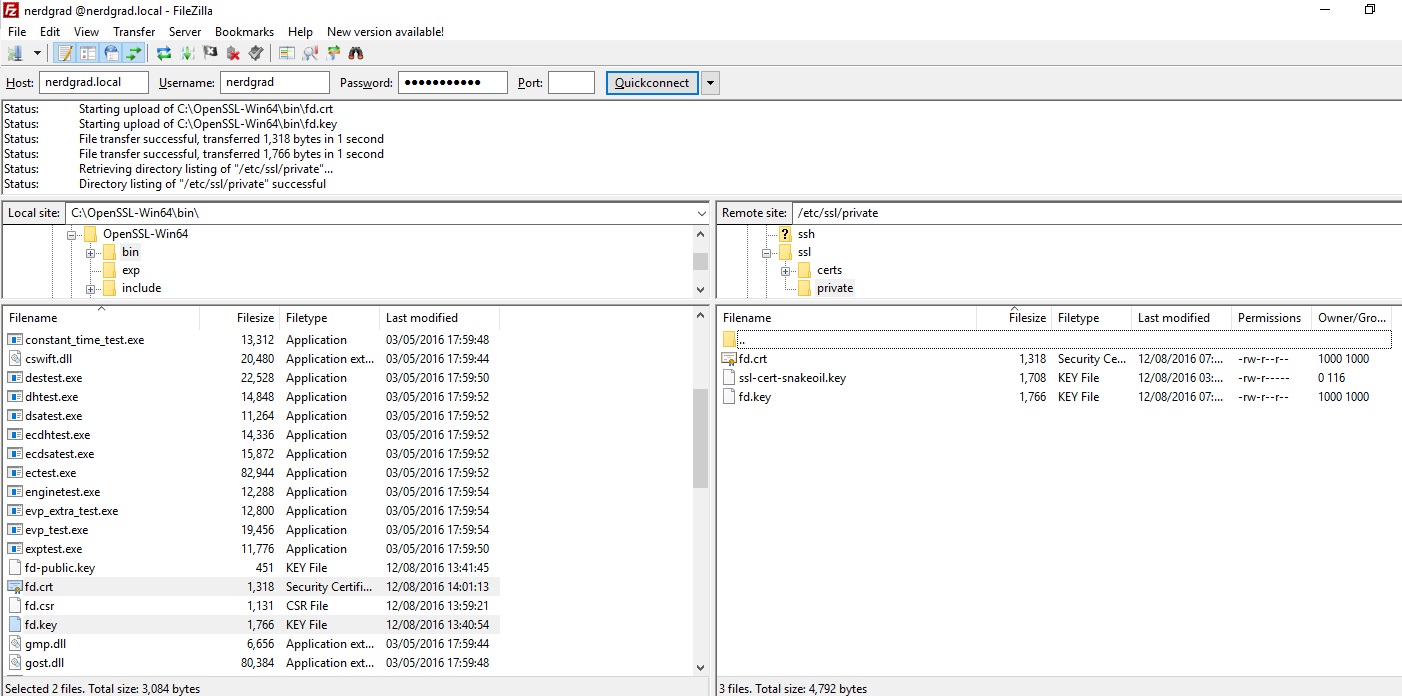
FTP – Move Certificate to Server
Using an FTP Client (FileZilla), put the certificate (fd.crt) & key (fd.key) onto the server in the following directory:
/etc/ssl/private/
Install Mod SSL on Apache
On the Apache server, issue the following to enable SSL: sudo a2enmod ssl
Next we need to edit the apache.conf file. sudo nano /etc/apache2/apache2.conf Add in the following to make the server listen on TCP port 443 for HTTPS (HTTP with TLS/SSL) 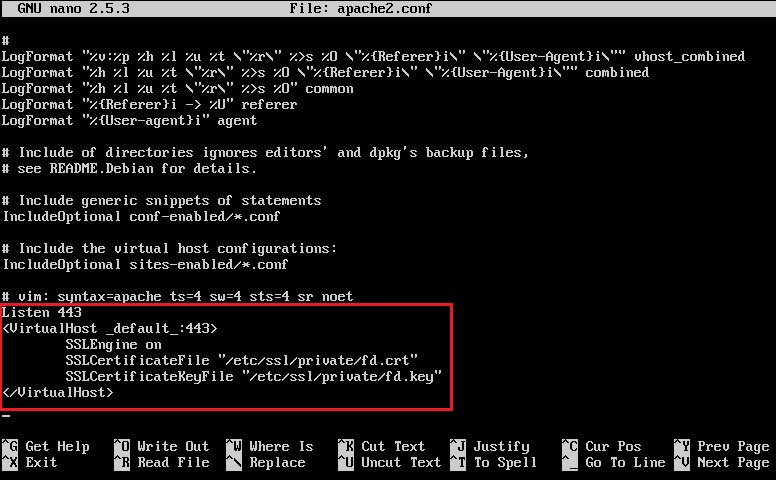
Add in the VirtualHost information to use port 443 and add the following SSL information within the tags. Naturally you’ll need to ensure the paths are correct and point to whatever your certificates/key is called.
You will have to enable the SSL site to be loaded by default and not the unsecure HTTP site. sudo a2ensite default-ssl enable Then sudo service apache2 reload
Restart the Apache service with:
sudo service apache2 restart
You should be prompted to enter in your passphrase for the certificate. 
Finally, navigate to your domain via https:// and you should see a shiny new padlock indicating that you are successfully using HTTPS. You will probably see a message saying the website is not secure and you will have to add a security exception in your browser. This is because we have self-signed. The whole point of SSL and CA’s is that external bodies verify you are who you say you are and that only intended parties can encrypt and decrypt messages. By using OpenSSL, we have told everyone that we think we are legitimate. If a normal online website asked you to add a security exception it would almost definitely be a dodgy site (unless they configured it wrong or self-signed haha). Hopefully this guide has helped, any questions feel free to post them below.